
Sometimes in December I came across Craigslist free post, it was a little black desk perfect for my son's room. It had stickers all over from different music bands. Once I saw this "beauty" I knew I had to have it. Lucky me who has in-laws with Suburban, dad gave me ride to Portland downtown so we could bring this baby home. (this is craigslist photo)

Once I brought it home my dear hubster was put to work to help me on this one. If you ever try to revive old furniture like I have tried, you might learn thing or two that have worked for me with this project.

First Step was to get the stickers off which were pretty stuck on the surface of the desk, for that I used drywall spackle knife.

Then the paint strip came in.
Please make sure that you have proper clothing worn to avoid risk of burns.

Get a cheap brush and brush away,

after 20 minutes get a drywall spackle knife and get scraping : )


Turned out that this desk had 3 different layers of paint plus stain. The results came out like this.


Another step: Sanding. At first I have used #60 sanding paper and then #120. Below you can see the results, it turned out not that bad. I had to work around the little corners with sponge sander to make sure that all of the old paint was gone. Make sure when you do all of this work you have a mask on, to protect yourself from old paint that might have led in it.

Next Step was to prime it, and as usual I have turned to my all to go Zinsser Cover Stain White Primer. This works as a sealer, primer that covers really well ALL kinds of surface, which includes leminates. I recommend using just a regular cheap foam brush so you can throw it away once you are done.


Once the primer has cured I sanded it in between coats (I have added two of them) I recommend allowing the drying time at least a day. Then I used two sanding papers 80 and 200 to get that smooth finish.

Then My little drawers came in, I decided to use blue paint left overs from Timmy's Old room (that we have painted back in California)

to get a little blue border as my little design I have used painters tape. I am a newb at this, so I have painted drawers with blue paint then covered with painters tape and added gray paint (again left overs of paint from my master bedroom)


and that's how the drawers will look after you peel the tape off


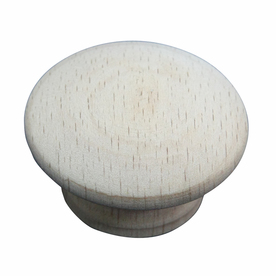
I had to replace old hardware, so I actually asked my son what he wanted. He chose the simple and round ones. You can get these at Lowes and they come in pair. I believe the cost is about $1.59. I decided to go with a blue color as well.
I've used same gray paint as for drawers for the main base of the desk.

After 3 coats of paint this is how it looked before I've added clear seal.

After the paint cured which was about a week I've sprayed with a clear sealer by Valspar and allowed it to dry for 3 days.
.JPG)
And here she is in my son's room. I liked it, but to me it seemed like something still was missing...
(please excuse my iphone quality photos)

After going through hubbys things I have found box of maps that he had collected over the years. I decided to go with Canada map.

Then measuring and cutting came in, yes I had to include a photo of me : )
(ignore our little Oreo peeking)


I've seen a lot of cute mod-podge projects on pintrest and decided to visit Joann's. What do you know lucky me, that week they had their 50% coupon out.

This step needed little persistence because map was made of regular paper and I wanted to avoid bubbles as much as I could. First I added layer of mod podge on the top of the drawer directly and then on the paper. As I have suspected there were a lot of bubbles. I took just a regular ruler and smoothed them out carefully. Then I've added another layer of the glue on top of the image. Total was 3 layers of mod podge, about 15 minutes of drying in between the coats. Once the glue dried I sprayed it with Valspar clear spray total of 3 coats, also allowing to dry in between coats. I recommend leaving something like this outside for few hours because the smell is pretty strong.

Next step was to put the drawer pulls back on.
.JPG)
And here's she is in its full glory...

and from a side...
.JPG)
and this one just for fun : )
.JPG)
This is just a reminder of how it look before

Here's breakdown of all the tools that I've used with this project:
1. Paint Sripper
- cheap brush
2. Drywall Knife
3. Electric Sander
3. Sanding Paper
4. Sanding Block
5. Purdy Brush (they are the best)
6. Zinsser Cover Stain White Primer
7. Cheap Foam brush
8. Paint of your choice
9. Painter's Tape
10. Valspar Clear Sealer (Gloss)
11. Mod-Podge
12. Pair of Sissors
13. Measuring Tape or Ruler.
Hope you have enjoyed the post!
LOVE IT!!!
ReplyDelete